This blog explains how to do Local peering between two Virtual Cloud Networks owned by two different Tenants in same region.
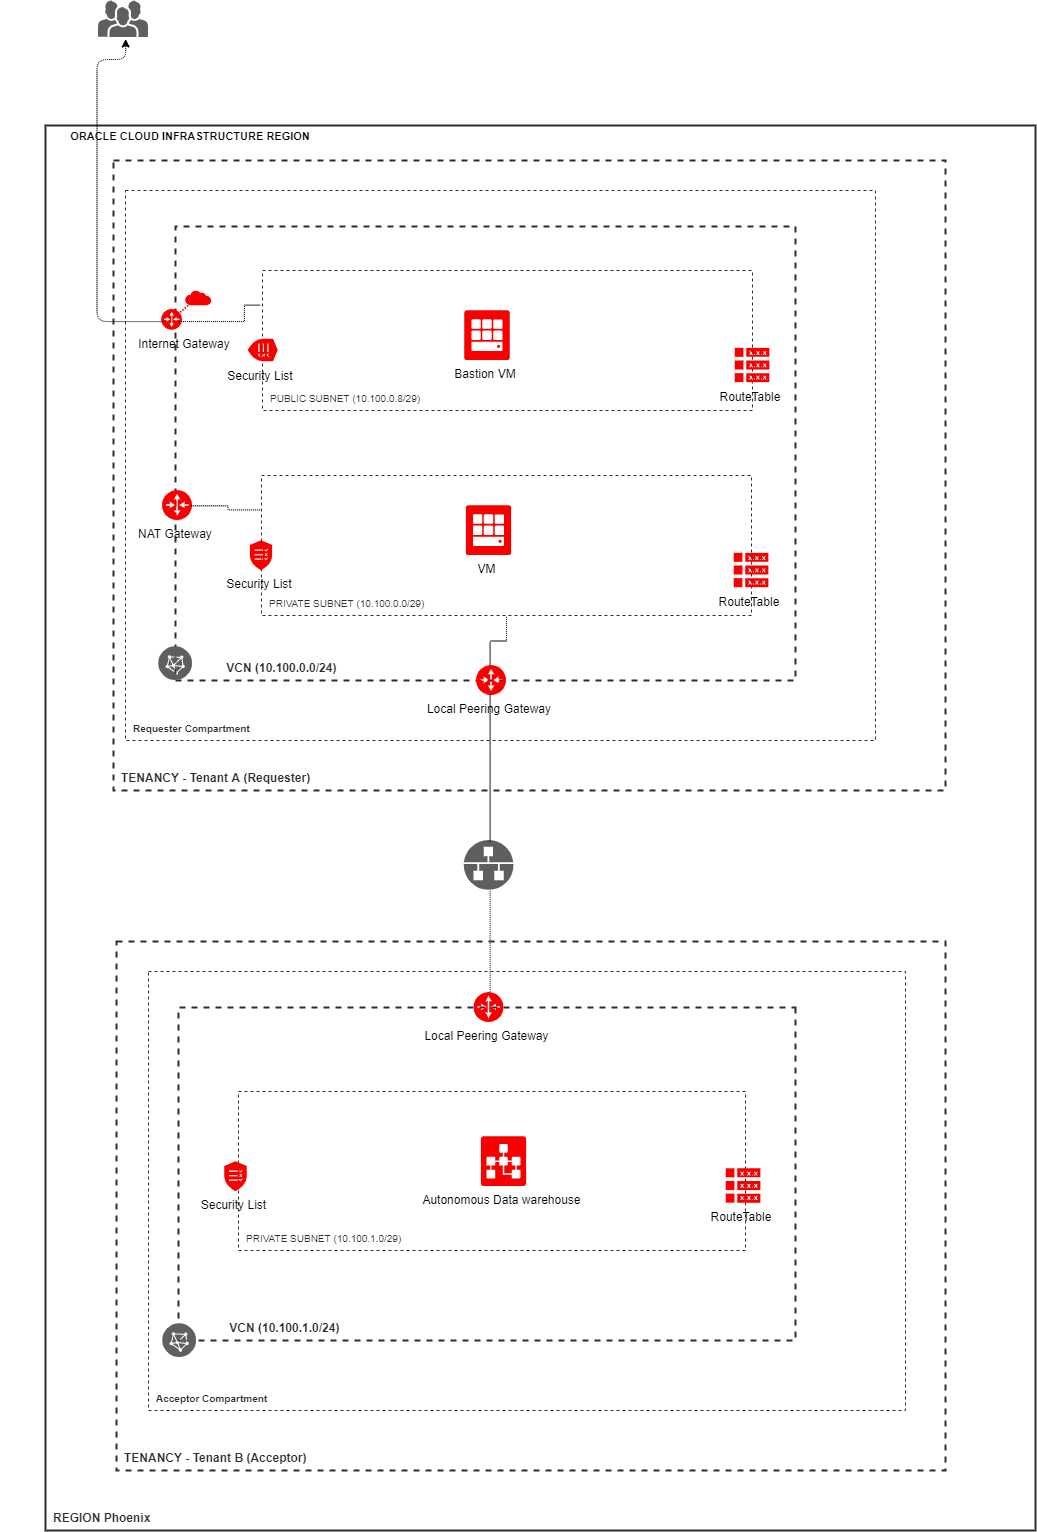
Here is a high level diagram which depicts the Oracle Cloud Infrastructure resources in this topology.
OCI Virtual Cloud Network Local Peering between tenancies in same Region
In Part I of this series, I’ll cover the high level steps required to setup the topology.
Part IIwill cover how to create required OCI resources in Tenancy 2 (Tenant B) in above diagram. Basically creates Compartment, VCN, Subnet, Network Security Group and then create a Autonomous Data Warehouse using Private Endpoint option. Also create Local peering Gateway required to connect to virtual machine in Tenancy 1 (Tenant A ) in above diagram. Since the other VCN is in a different tenancy(Tenant B), need to add IAM policies to allow peering between tenancies.
Part IIIwill cover how to create required OCI resources in Tenancy 1(Tenant A) in above diagram. Basically creates Compartment, VCN, two regional subnets, two virtual machines(bastion host in public subnet and another virtual machine in private subnet used to connect to Autonomous Database in Tenant B). Also creates Internet Gateway required to connect to internet from public subnet. And creates NAT Gateway required to make outbound connections from private subnet to download required softwares. Also create Local peering Gateway to connect to Autonomous database in Tenant 2. Since the other VNC is in a different tenancy(Tenant A), need to add IAM policies to allow peering between tenancies.
Part IVwill cover how to establish peering connection between Virtual cloud networks owned by different tenants. Once connection is established, install required Oracle client software on the virtual machine in private subnet. And connect to autonomous database in Tenancy 2.
The main goal of virtualization/containerization is to provide a certain level of isolation of host resources(CPU/ Memory/ Network/ Filesystem etc) used by each service/application running on the host. Before we go into details of container/containerization/virtualization, let's look at the origin of virtualization.
Chroot environments
The UNIX/LINUX chroot command (stands for change root) allows to create file system level isolation in a host. chroot command changes the root of the filesystem for a process and it's child processes.This would help to run an unprivileged service like a web server in a protected environment(chroot jail). The web server process can see only files under the root directory of the chroot environment.
But this provides only a crud level of file system isolation. The web server can still hog other resources of the host like CPU/Memory/Network.
Chroot feature was available as early as 1979 in version 7 of UNIX. This feature was added to BSD in 1982.
FreeBSD jail
FreeBSD enahcened the chroot environment feature and provided the jail feature in 2000. This feature enabled lightweight virtualization. Each virtual environment running on a shared host has its own processes, files, network and users. And the overhead of a jail is < 10MB.
The freeBSD jail doesn’t provide true virtualization. The OS kernel is still shared by all virtual environments. Also there is no way to limit CPU/Memory usage by each jail. Still freeBSD jail is a very popular solution used in production.
Virtualization
Virtualization provides strong isolation compared to FreeBSD. Basically instead of installing an Operating System you would install a software layer called hypervisor on a host. Then you would log in to the hypervisor and create virtual machines. And each virtual machine will have its own Operating System. So nothing is shared between two virtual machines running on a host. The hypervisor is interacting with the hardware resources of the host machine and allocates these resources to the virtual machines.
Containerization
Container is an advanced version of chroot and FreeBSD jail. It's built on top of two Linux kernel features called control groups (cgroups) and Linux namespaces.
Google originally developed Control Groups(cgroups) and contributed to the Linux kernel in 2008. Control groups (cgroups) allow you to isolate resources like CPU, Memory, Network and block IO used by a group of processes. It also allows you to stop and start(control) a group of processes. This feature along with the Linux namespaces are the foundation for containers. Linux namespaces allow you to isolate network and process space.
Docker leveraged cgroups and namespaces to come up with containers. Docker is the most popular containerization technology. Docker ecosystem makes it easy to build and share images. And create/manage containers using the image.
Docker makes it very easy to create an image. All you need to do is to create a file(Dockerfile) and specify all the dependencies in it. Then use the docker command to create an image based on the Dockerfile. Then you can create a container using the created image. The container is executed in the docker container runtime engine.
The docker engine is a client-server application. The docker container runtime aka the docker daemon(dockerd). This is the server part. There are two types of clients available. Docker client aka docker command line interface (docker). This client is used to create images and create containers using the image. Also used to manage the lifecycle of the containers.
Docker REST APIs and SDKs. These interfaces can be used to interact with docker engines.
After creating the image, you can upload the image to dockerhub. This is a repository to store and share images. You can version the images too.
Containers are light-weight compared to virtual machines. Containers share the host operating system kernel. Whereas each virtual machine has its own operating system. A good analogy is process vs thread. There is some overhead to spawn a new process. Similarly there is some overhead to start a virtual machine, and need to bring up the operating system. Threads are lightweight processes. Threads are created inside the process and they share the resources of the process. So there is less overhead. Similarly containers share the host operating system kernel, so starting up a container is faster than starting up a virtual machine.
Lets look at the definition from docker.com : “A container is a standard unit of software that packages up code and all its dependencies.”
Packaging an application and it's dependencies together helps to keep the dev/stage/pre-prod/prod environments as similar as possible. This is very important for Microservice architecture bases applications.
There are many prerequisites to learn Kubernetes.It's difficult to understand a container orchestration tool without understanding containers. And how to package and deploy applications using containers. When you search for containerization you will come across the term Microservices also.
Also you will see articles comparing containerization with virtualization and virtualization with non-virtualization. And if you keep searching it goes to the history of UNIX. And you search enough, you will see references to Google Borg, chroot environments and UNIX network jail.
I’ll try to touch up on these concepts before getting into the details of Kubernetes.
Microservice
Before Microservices, applications were monolithic. For example an online shopping application has sub systems like customer profile, catalog, shopping cart, customer wish list. You can break down this monolithic application into a bunch of sub systems. And model each one as a Microservice.
There are many advantages of breaking down a monolithic application into Microservices.
You can make changes to each Microservice independently and deploy them. Typically each Microservice has a separate code base. This would reduce dependency between teams and make development /deployment more more agile.
In a monolithic application, you need to scale the entire application. Even though some of the sub systems are less utilized. But you can scale each Microservice independently on a need basis.
Typically monolithic applications are based on a single technology stack. But in a Microservices based architecture, the Microservices talk to each other over REST APIs. So each Microservice has the flexibility to choose the most appropriate technology stack.
But there are disadvantages too. Microservices based architecture increases complexity. In a monolithic application, for example a J2EE application, the entire application is running in a single JVM. So it's easy to make a call from one subsystem to another. But in Microservices architecture, each Microservice runs in it's own JVM. And there is no way to make direct calls. So you would need to make calls using REST API.
Since each service is built and deployed independently, there is no way to know the URL of the other Microservice up front. You may scale out a particular service based on need and there could be multiple instances of the service running on different hosts. So there are additional services required to discover a service. Then only you can invoke a REST API present in that Microservice. A Service Registry is used to register all the Microservice instances. Basically the URL and some additional metadata about each Microservice instance is published in the service registry. Whenever a microservice comes up, it will register these details with the service registry. And when a Microservice needs to invoke another, it can first perform a lookup against the registry to get the URL of the other Microservice(IP address/Port etc). This service discovery layer add complexity.
These additional layers(registry/lookup) increase latency. In a monolithic application(say J2EE app) everything is running in a single JVM and there is no network latency to invoke one sub system from another. But in Microservices architecture, you need to first do a service discovery(service registry lookup) to get hold of the other Microserviece instance URL and and then invoke the REST API, this would increase the network latency.
Compared to Microservices, it's easy to troubleshoot/diagnose a monolithic application. You just need to go to the application server logs to start triage. But in a Microservices based application, these services may be running on different hosts and there could be multiple instances of each service. It's a challenge to even identify the correct host and then get to the log location in production. Also you need to correlate the logs as the log messages related to a workflow might go across Microservices.
Another challenge is packaging and deploying multiple Microservices. Containers are used widely to package and deploy Microservices. In the next part I'll go through containerization concepts.
Friday, February 21, 2020
How to connect to Oracle ATP using SQL Plus
I have created ATP instance using terraform from OCI compute instance. Here are the steps to connect to ATP instance using sqlplus, from OCI compute instance.
Install Oracle Instant Client RPM
I have provisioned compute instance using Oracle Linux 7.6 image. From OCI compute instance, run below steps to install instant client.
to pull the correct yum repo, need to figure out the OCI Region. My account is in Ashburn region(Home Region). Use below steps to figure out the region code.
cd /etc/yum.repos.d

# specific to OCI compute instances, get the yum mirror for the region
export REGION=`curl http://169.254.169.254/opc/v1/instance/ -s | jq -r '.region'| cut -d '-' -f 2`

# use below commands to verify that the region is set
export | grep REGION
or
echo $REGION

I am in Ashburn region. So above commanded returned iad

#  below command will download the yum repo file your your region
sudo -E wget http://yum-$REGION.oracle.com/yum-$REGION-ol7.repo

# Since I am in Ashburn region, it downloaded yum-iad-ol7.repo
# open yum-iad-ol7.repo
less yum-iad-ol7.repo

TBD # List available packages before enabling the repo - include image
# list all packages with name
yum list oracle-instantclient*

# There is and entry with name "ol7_oci_included" in yum-iad-ol7.repo
# enable repository wih name "ol7_oci_included" using yum-config-manager
sudo yum-config-manager --enable ol7_oci_included
list all packages after enabling the repo
yum list oracle-instantclient*
We can see that oracle-instantclient* packages are available now.
Now sqlplus binary is available under /usr/lib/oracle/18.3/client64/bin
Download and unzip wallet zip file
Since I have created ATP instance using terraform, from this OCI compute instance, the wallet zip file is already available under "/home/opc/atp-example/autonomous_database_wallet.zip"
Otherwise you need to login to ATP Instance's Service Console. Default user name is "admin". After login, go to Administration link on left side. And click "Download Client Credentials (Wallet)"
Provide a wallet password to download the wallet zip file. Now this client credentials (wallet) can used to login from SQL Developer and other sql clients liek SQL Plus. If you have downloaded the zip from windows, you would need to scp the file to OCI compute host.
Once the wallet zip is present on oci compute host, continue with below steps.
Unzip wallet archive
unzip autonomous_database_wallet.zip cd autonomous_database_wallet
Modify sqlnet.ora
Modify sqlnet.oraand give path to walet folder as "/home/opc/atp-example/autonomous_database_wallet"