## Installing the NodeSource Node.js 10.x repo...
## Populating apt-get cache...
+ apt-get update
Get:1 http://security.ubuntu.com/ubuntu xenial-security InRelease [107 kB]
Hit:2 http://in.archive.ubuntu.com/ubuntu xenial InRelease
Get:3 http://in.archive.ubuntu.com/ubuntu xenial-updates InRelease [109 kB]
Get:4 http://security.ubuntu.com/ubuntu xenial-security/main amd64 Packages [511 kB]
Get:5 http://in.archive.ubuntu.com/ubuntu xenial-backports InRelease [107 kB]
Get:6 http://in.archive.ubuntu.com/ubuntu xenial-updates/main amd64 Packages [796 kB]
Get:7 http://security.ubuntu.com/ubuntu xenial-security/main i386 Packages [452 kB]
Get:8 http://in.archive.ubuntu.com/ubuntu xenial-updates/main i386 Packages [727 kB]
Get:9 http://security.ubuntu.com/ubuntu xenial-security/main Translation-en [219 kB]
Get:10 http://security.ubuntu.com/ubuntu xenial-security/main amd64 DEP-11 Metadata [67.7 kB]
Get:11 http://security.ubuntu.com/ubuntu xenial-security/main DEP-11 64x64 Icons [72.5 kB]
Get:12 http://security.ubuntu.com/ubuntu xenial-security/restricted amd64 Packages [7,204 B]
Get:13 http://security.ubuntu.com/ubuntu xenial-security/restricted i386 Packages [7,224 B]
Get:14 http://security.ubuntu.com/ubuntu xenial-security/restricted Translation-en [2,152 B]
Get:15 http://security.ubuntu.com/ubuntu xenial-security/universe amd64 Packages [355 kB]
Get:16 http://in.archive.ubuntu.com/ubuntu xenial-updates/main Translation-en [329 kB]
Get:17 http://in.archive.ubuntu.com/ubuntu xenial-updates/main amd64 DEP-11 Metadata [318 kB]
Get:18 http://security.ubuntu.com/ubuntu xenial-security/universe i386 Packages [303 kB]
Get:19 http://in.archive.ubuntu.com/ubuntu xenial-updates/main DEP-11 64x64 Icons [231 kB]
Get:20 http://in.archive.ubuntu.com/ubuntu xenial-updates/restricted amd64 Packages [7,560 B]
Get:21 http://in.archive.ubuntu.com/ubuntu xenial-updates/restricted i386 Packages [7,520 B]
Get:22 http://in.archive.ubuntu.com/ubuntu xenial-updates/restricted Translation-en [2,272 B]
Get:23 http://in.archive.ubuntu.com/ubuntu xenial-updates/universe amd64 Packages [636 kB]
Get:24 http://security.ubuntu.com/ubuntu xenial-security/universe Translation-en [132 kB]
Get:25 http://in.archive.ubuntu.com/ubuntu xenial-updates/universe i386 Packages [581 kB]
Get:26 http://security.ubuntu.com/ubuntu xenial-security/universe amd64 DEP-11 Metadata [107 kB]
Get:27 http://security.ubuntu.com/ubuntu xenial-security/universe DEP-11 64x64 Icons [142 kB]
Get:28 http://security.ubuntu.com/ubuntu xenial-security/multiverse amd64 Packages [3,456 B]
Get:29 http://security.ubuntu.com/ubuntu xenial-security/multiverse i386 Packages [3,620 B]
Get:30 http://security.ubuntu.com/ubuntu xenial-security/multiverse Translation-en [1,744 B]
Get:31 http://in.archive.ubuntu.com/ubuntu xenial-updates/universe Translation-en [256 kB]
Get:32 http://in.archive.ubuntu.com/ubuntu xenial-updates/universe amd64 DEP-11 Metadata [246 kB]
Get:33 http://in.archive.ubuntu.com/ubuntu xenial-updates/universe DEP-11 64x64 Icons [331 kB]
Get:34 http://in.archive.ubuntu.com/ubuntu xenial-updates/multiverse amd64 Packages [16.4 kB]
Get:35 http://in.archive.ubuntu.com/ubuntu xenial-updates/multiverse i386 Packages [15.5 kB]
Get:36 http://in.archive.ubuntu.com/ubuntu xenial-updates/multiverse Translation-en [8,344 B]
Get:37 http://in.archive.ubuntu.com/ubuntu xenial-updates/multiverse amd64 DEP-11 Metadata [5,964 B]
Get:38 http://in.archive.ubuntu.com/ubuntu xenial-updates/multiverse DEP-11 64x64 Icons [14.3 kB]
Get:39 http://in.archive.ubuntu.com/ubuntu xenial-backports/main amd64 Packages [4,844 B]
Get:40 http://in.archive.ubuntu.com/ubuntu xenial-backports/main i386 Packages [4,836 B]
Get:41 http://in.archive.ubuntu.com/ubuntu xenial-backports/main amd64 DEP-11 Metadata [3,328 B]
Get:42 http://in.archive.ubuntu.com/ubuntu xenial-backports/universe amd64 Packages [7,400 B]
Get:43 http://in.archive.ubuntu.com/ubuntu xenial-backports/universe i386 Packages [7,084 B]
Get:44 http://in.archive.ubuntu.com/ubuntu xenial-backports/universe Translation-en [3,996 B]
Get:45 http://in.archive.ubuntu.com/ubuntu xenial-backports/universe amd64 DEP-11 Metadata [5,100 B]
Get:46 http://in.archive.ubuntu.com/ubuntu xenial-backports/universe DEP-11 64x64 Icons [1,788 B]
Fetched 7,279 kB in 4s (1,537 kB/s)
Reading package lists... Done
## Confirming "xenial" is supported...
+ wget -qO /dev/null -o /dev/null 'https://deb.nodesource.com/node_10.x/dists/xenial/Release'
## Adding the NodeSource signing key to your keyring...
+ wget -qO- https://deb.nodesource.com/gpgkey/nodesource.gpg.key | apt-key add -
OK
## Creating apt sources list file for the NodeSource Node.js 10.x repo...
+ echo 'deb https://deb.nodesource.com/node_10.x xenial main' > /etc/apt/sources.list.d/nodesource.list
+ echo 'deb-src https://deb.nodesource.com/node_10.x xenial main' >> /etc/apt/sources.list.d/nodesource.list
## Running `apt-get update` for you...
+ apt-get update
Hit:1 http://security.ubuntu.com/ubuntu xenial-security InRelease
Hit:2 http://in.archive.ubuntu.com/ubuntu xenial InRelease
Get:3 https://deb.nodesource.com/node_10.x xenial InRelease [4,611 B]
Hit:4 http://in.archive.ubuntu.com/ubuntu xenial-updates InRelease
Get:5 https://deb.nodesource.com/node_10.x xenial/main amd64 Packages [765 B]
Hit:6 http://in.archive.ubuntu.com/ubuntu xenial-backports InRelease
Fetched 5,376 B in 0s (6,709 B/s)
Reading package lists... Done
## Run `sudo apt-get install -y nodejs` to install Node.js 10.x and npm
## You may also need development tools to build native addons:
sudo apt-get install gcc g++ make
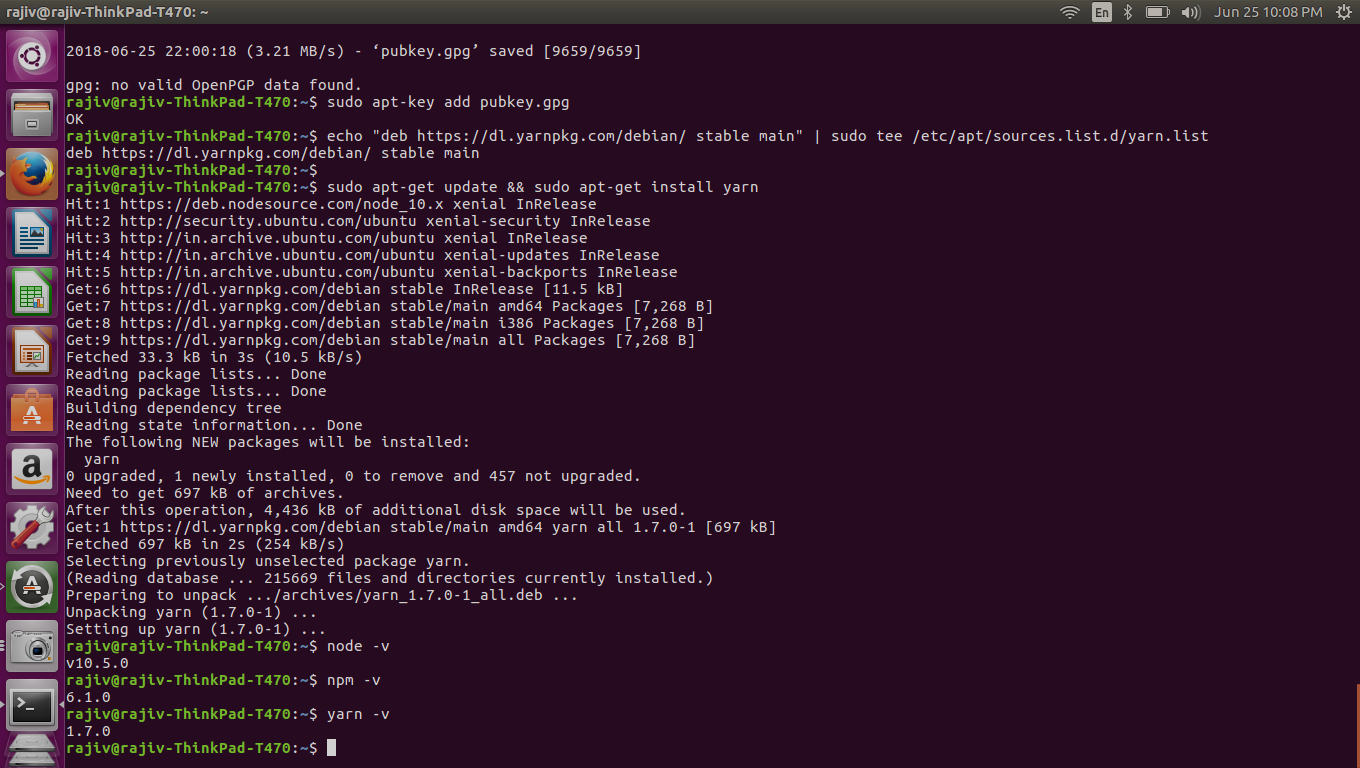
## To install the Yarn package manager, run:
curl -sL https://dl.yarnpkg.com/debian/pubkey.gpg | sudo apt-key add -
echo "deb https://dl.yarnpkg.com/debian/ stable main" | sudo tee /etc/apt/sources.list.d/yarn.list
sudo apt-get update && sudo apt-get install yarn